How to create basic simple motion text in Adobe After Effects like this sample video
Step 1
To showing layer mode in Adobe After Effects, Right Click at Source Name on Timeline, then Select Columns - Modes.
Step 2
To creating a text can also use Right Click at Timeline area, then select New - Text.
Step 3
Type text as you want, sample here "Basic Animation Text".
1. Tab tool to change text size, space and color.
2. Tab tool to change text paragraph.
Step 4
Click drop down arrow icon layer Basic Animation Text - Click down arrow icon Transform - Position then click and activated Animation Key position. Now the animation key is show appearing in timeline bar.
Step 5
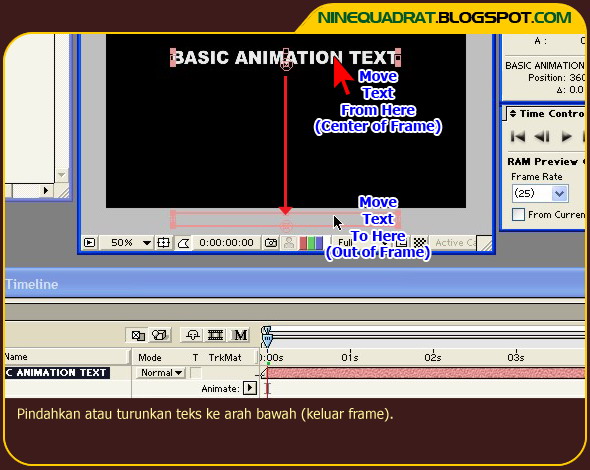
Move down text from center to out frame
Step 6
1. Move Timeline Guide to end position of frame line (5s).
2. Then move again text from out frame to center of frame like this picture below. So the Animation Key is appearing again in Adobe After Effects Timeline.
Step 7
For the test movie click play Time Controls Tool or by press keyboard space bar. Now you can see animation text from bottom out frame move to in frame of screen.
For the best result, you can create variation and combination 3D Text Animation, Adobe After Effects CS, Adobe Flash CS and Autodesk 3D Studio Max like this demo.
Hopefully Useful!
Post By: N i n e q u a d r a t
This Article Dedicated to My Students
Graphic Design and Animation Class
Excellent Program, D a a r E l Q o l a m - B a n t e n
Graphic Design and Animation Class
Excellent Program, D a a r E l Q o l a m - B a n t e n


7 comments:
thanks so so much for the lovely comment!!!
Your blog is absolutely great!! Thank you for following!
Best regards, Klodi
other great tutorial...numero uno
Members (414) follow me back friend
Members (415) follow me friend please
I like it
@jimdaniel
thanks for your link info jimdaniel, i was try to create it.. and i like it :)
Hi, its pleasant paragraph concerning media print,
we all be familiar with media is a wonderful source of data.
My web page: Computer Repair
Posting Komentar